Canon 80d Set Remote or Continuous
The appeal of nightscape photography lies in being able to express a world of light and colours that cannot be seen or felt during the day. Here are some camera functions that will help you unleash your creativity on the spot and capture images with a difference! (Reported by Yurika Kadoi, Digital Camera Magazine)

EOS 80D/ EF-S18-135mm f/3.5-5.6 IS USM/ FL: 24mm (38mm equivalent)/ Bulb timer (f/16, 60 sec)/ ISO 100/ WB: Daylight
Long exposures of more than 30 seconds are easier with the Bulb timer function. I had the continuous flow of light in mind when I captured these light trails from a ship. As the water surface was dark when I started he exposure, I placed the focus on the bright buildings in the background.
1. Bulb timer: Your best friend for light trails and other long exposures
Vehicle light trails and smooth, silky long-exposure water surfaces are a great way to capture nightscape with a difference. But depending on your subject and the effect that you have in mind (star trails, anyone?), you might need to use bulb mode and expose your shot for more than 30 seconds.
On cameras without a bulb timer function, this means that you have to either:
i) Hold down the shutter button for as long as you require, or
ii) Use a remote switch (or the remote shooting function in the Canon Camera Connect app).
For both scenarios, you need to keep track of the time so that you know when to end the exposure.
But if your camera has a bulb timer (usually on intermediate and advanced cameras such as the EOS 90D, EOS M6 Mark II, or an EOS R system camera), you can preset the duration of the exposure from anywhere between 1 second to 99 hours, 59 minutes and 59 seconds. The camera will automatically end the exposure, so you don't have to keep track of the timing.
Tip: Remember to take precautions against camera shake! Pressing the shutter button can cause camera shake too, so use either the 2-second self-timer or Touch Shutter.
How to set the bulb timer*
(Procedure might differ depending on the camera model. Do refer to your camera manual for more details)

1. Turn the mode dial to [B (Bulb)].

2. Select [Bulb timer] from the shooting menu. After selecting [Enable], press the [INFO] button. The default setting is [Disable].

3. Determine the exposure time on this screen. You can set an exposure time of anything from 1 sec to 99 hours 59 minutes 59 sec.
2. Multi Shot Noise Reduction: Make your handheld high ISO speed shots even clearer
When we take handheld night shots, we usually want to use a faster shutter speed to avoid camera shake. This means using a higher ISO speed, which increases the likelihood of visible image noise. If you are shooting a scene with no moving subjects, a handy function for getting clearer high ISO images is the Multi Shot Noise Reduction function.

EOS 80D/ EF-S10-18mm f/4.5-5.6 IS STM/ FL: 10mm (16mm equivalent)/ Multi Shot Noise Reduction (f/5.6, 1/20 sec, EV+0.3)/ ISO 6400/ WB: 4,500K
I selected an ultra wide-angle lens as I wanted to get a dynamic picture of the expanse of wires. In order to adjust the colour to my preferred blueness, I specified the white balance using the colour temperature.
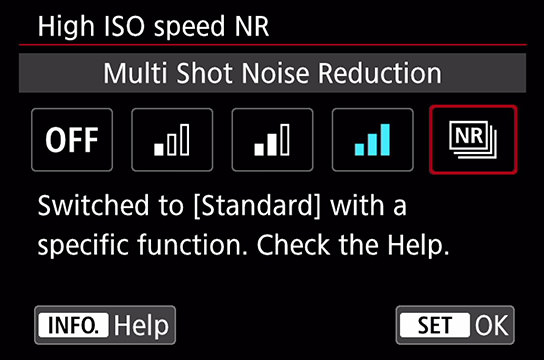
Select [Multi Shot Noise Reduction]
Select [Multi Shot Noise Reduction] from the [High ISO speed NR] menu. Take note that this function cannot be set if RAW or RAW+JPEG is selected for the recording format.
How it works
When Multi Shot Noise Reduction is enabled, the camera takes 4 different consecutive exposures, aligns them, and averages the random noise in each of them when it merges them. The single JPEG image that results has much less noise than what you get from normal noise reduction.
Take a look at the following examples, which were shot on the EOS 80D with the same exposure settings:
ISO 6400 (with Multi Shot Noise Reduction)

ISO 6400 (shot normally)


Tip:Improvements to technology mean that newer cameras are capable of shooting clean images at increasingly higher ISO speeds. But depending on the context, it might be good to take any precautions you can against image noise. For example, image noise can be more obvious than expected if you make a large print of your shot or display it on a large screen.
3. Multiple Exposures function: Create a surreal new world
If your camera has the Multiple Exposures function, play around with it and see what kind of whimsical images you can create! It's actually very simple:
i) Go to the Shoot menu.
ii) Enable Multiple Exposures.
iii) Choose the Multi-exposure control ("Multi-expos ctrl") method. (I chose "Average" for the shots below.)
iv) Set the number of exposures you want to layer (For the shots below, I used two exposures.)
v) Press the shutter button to capture each exposure.
Tip: If you are using a DSLR camera, shoot in Live View. Being able to preview each shot makes it easier to adjust the size and position.

EOS 80D/ EF-S18-135mm f/3.5-5.6 IS USM/ FL: 132mm (211mm equivalent)/ Aperture-Priority AE (f/5.6, 2 sec, EV±0)/ ISO 200/ WB: TungstenThis image combines two exposures shot from the same position: one that is sharper, and another with much shallower focus. This made the lights appear soft and dreamy.
Know this: What's the difference between "Additive" and "Average" multi-exposure control?
The "Multi-expos ctrl" setting lets you set how the camera merges your shots.
Additive: The exposure of each image captured is added cumulatively. You will have to use negative exposure compensation or underexpose your shots to prevent the final image from looking too bright.
Average: The camera controls the exposure of the shots to be merged so that the final image has the standard exposure.
"Additive" can be tricky to get correct. When unsure, choose "Average".
Tip: Adjust the amount of overlap in the 2 images
I took the sharp "base shot" first, and the one with the bokeh lights after that, making slight adjustments to angle of view to get the intended effect. You might also need to change your shooting position slightly to achieve your ideal results.

1st shot

2nd shot
(Interest piqued by the bokeh circles in the 2nd shot? Here are some more ideas on how you can use them to create dramatic nightscapes)
Receive the latest update on photography news, tips and tricks.
Be part of the SNAPSHOT Community.
Sign Up Now!
Source: https://snapshot.canon-asia.com/my/article/eng/3-useful-camera-functions-for-shooting-nightscapes
0 Response to "Canon 80d Set Remote or Continuous"
Post a Comment